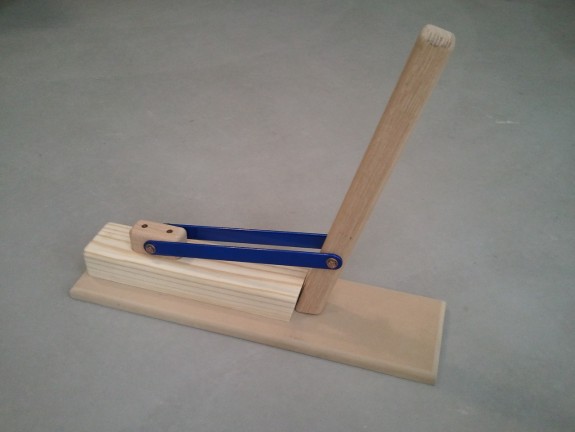
Rib Flange Straightener Built
When I opened the Empennage kit last year, a nice little freebie in the box was a copy of the 27 Years of the RVator. It literally is a treasure trove of knowledge of all the articles that the Mother Land (Van’s Factory) had done over the last number of years. While many of the articles dealt with items that the earlier builders had to deal with, it is good read for the information and practices. It is apparent when reading through the info, that Van’s listens to it’s builders as many of these articles on how to do this, that, etc. are now just incorporated in the newer kits. Thank you to all those prior builders for your work and contribution!
One of the articles I saw really caught my eye. It described this simple tool that builder Bill Gast made. I had heard of a mystical tool that one could build that would make the job of straightening the rib flanges to 90° a chore of joy. Since one of the more tedious tasks on the wings is this rib flange straightening, I was all for making it less of a task if able. I read this article and set out to make my own version. Before I started, I also searched the forums over at VAF, like you should for most questions, and saw a few other versions with clearer pictures.
The trick here is having the right angle on the part that the flange gets pushed into (the anvil). Upon the advice of both the article and the posts on VAF, 11° seems to be about the consensus. With all the information in hand, It was time to construct a new tool.
Bill of Materials:
6″ x 20″ x 3/4″ MDF Plywood Base Plate
2″ x 4″ x 12″ Anvil with 11° undercut on one face. (Mine was actually a chunk of a 5″ x 5″ post that I cut to shape.)
1 1/2″ x 1 1/2″ x 30″ Oak stick purchased at Lowes Aviation Supply. (Note, my local Home Depot Aviation Supply had the same but it was two 1 1/2″ x 3/4″ x 30″ sticks laminated together.)
Cut a 3″ long piece to accept one bolt for the arms
Cut a 20″ long piece with a 22 1/2° angle cut on one end of the handle/pinch bar
The angle is so that the bottom of the pinch bar clears raised portions of the rib like lightening hole flanges.
3/16″ x 1″ x 36″ flat bar stock from the metal bins at Lowes Aviation Supply
I cut two pieces 12″ long for arms.
Two 1/4″ x 20 x 2 1/2″ Bolts
Two 1/4″ Nylock Nuts
Four 1/4″ washers
2″ and 3″ wood screws
After cutting the bar stock to the 12″ lengths, I match drilled on the drill press, the 1/4″ holes in both ends so that they would match exactly. I then radiused the ends on the grinder and polished them smooth (No burrs to scratch parts or humans). I had some paint left over from a project years ago, and since the color did not matter, better to use it than toss it. I sprayed the arms for protection.
I then took all the wood, cut to length and with the angles cut into the handle/pinch bar and anvil, I ran all the exposed edges over a 3/8″ router bit on my neighbors router table. This makes the handle very comfortable to use. As for the other edges, I was there and the router table was setup, so why not.
I attached the Anvil to the Base Plate, centered on the the long axis of each, with some 2″ wood screws. I eyeballed the location of the metal arms on the handle (approx 4″ from the bottom) and center drilled a 1/4″ hole through it. I attached the arms with a 2 1/2″ bolt and washers on the outside of each bar and tightened the Nylock nut just shy of tight, allowing the bars to pivot on the pinch bar.
I then center drilled on both the length and height of the smaller 3″ oak piece for the other 1/4″ bolt hole, and attached the bars to it. Lastly, I positioned the small oak piece along the center line of the anvil until I had the pinch bar just proud of the anvil face. Essentially, this allows the pinch bar to fully push the rib into the corner of the anvil and the base plate without pinching the thickness of the flange itself. Once the position looked good, I attached the small oak piece to the anvil with 3″ wood screws.
There you have it, the rib flange straightener. I clamped it to the bench and did a quick test on a few leading edge ribs and it appears to work GREAT! Like all tools, it takes a little to get the feel, but with little effort, the flanges on the ribs turned out pretty close to 90° very quickly. I wish I had this when I was working on the Empennage ribs.
Thanks to Bill and the VAF guys for the ideas.


