Archive

Archive for May, 2014

Left Tank Lines Complete, Senders Started

May 30th, 2014 No comments
Left Vent and Return

Left Vent and Return

Had a couple of minutes…uh huh…to head to the shop tonight. Decided to fabricate the left tank vent line. It actually went pretty fast as I used the right line as a template. What I did forget to do was to slide the flare sleeve on to the tubing before I bent it. Seems a little out of order, but I had already flared the end before bending. DOH! So, I had to cut off the nice flare I had done and re-flare. Speaking of flares….

I read on a thread on VAF about flare size specs. I shouldn’t have. Turns out most of mine were too small in diameter. I had to wonder why, since my Rolo-Flare tool from Parker has a depth gauge. As it turns out, I was not clamping the tubing quite tight enough in the dies, and when I began the flare, it pushed the tubing back in the tool. This created flares way under spec. For 1/4″ tube the flare should be 0/35″ ± .01″. Mine were anywhere from 0.32″ – 0.33″. For more info, click the link for the thread. Needless to say, I redid all the flares already complete in the right tank. Fortunately, I have  tubing cutter that allows me to get really close to the prior flares, so the tubing length loss was minimal on the right tank lines. Left tank lines are just right.

Left Outboard Capacitive Sender Plate Installed

Left Outboard Capacitive Sender Plate Installed

Once the tank lines were complete, I figured I would install (or at least test fit) the left tank Capacitive Fuel Sender plates to get ready to complete the interior component parts. Above you see the outboard plate in place and the wire run inboard to the other plate. Eventually, I will put dabs of sealant on the wire/line interface to hold it solid.

Left Inboard Capacitive Sender Plate

Left Inboard Capacitive Sender Plate

And here is the inboard plate, screwed into place. I need to measure and trim the wires and then crimp them into the ring terminals, screw them to the plate, and then seal the terminals/wires/screws. Once done, it will be time to seal and rivet the outboard and inboard most ribs. Moving along. Still praying for leak free tanks!


Categories: Tanks

Tank Interior Plumbing Starts, Right Tank Lines Done

May 29th, 2014 No comments
Measuring the Return Line Length

Measuring the Return Line Length

I decided to head to the shop after work and check on the cure status of the sealant on the rivets. Upon finding it was tack free, I figured I would just work on the return lines and call it good for the night. A long time ago, I bought some lengths of 5052-O tubing from Aircraft Spruce. I have been storing it ever since with the intent of using it in my tanks to replace the flimsier 3003-O that Van’s supplies in a coil. The Van’s supplied stuff is REALLY soft but usable. Many builders opt for the 5052-O to make better, stronger lines. I fall into that camp as well. I will use the 3003-O for practice and prefabrication.

Back to the return lines…I purposely drilled my return lines to be a straight shot from the fitting to the last interior outboard rib. All I had to do was insert the bushings in each rib, slide in the tube, measure, cut, flare, install. Sounds easier than it was because I had to remove and reinstall the most inboard rib a few times to get it all right and ready.

For those not familiar with why some builders opt for return lines while others don’t. I am simply because I don’t know what is coming, and doing it now is easy. Some injections systems use them, others don’t. Worse comes to worse, I simply cap it off and call it good. If I do end up needing them, easy as can be to use them.

Above you can see the tube stock, run to the last bay, before I cut it.

Left Tank Return Line Fabrication

Left Tank Return Line Fabrication

Once I cut it to length and flared it, I simply inserted it and temporarily attached the AN fittings to the inboard rib for a test fit. Looks good. It took me about 20 minutes to complete the left, so I repeated to process for the right tank.

It’s amazing how doing it once speeds up the second time and beyond. The right tank return line took about 15 minutes to complete. Feeling like I was on a roll, I decided to press on.

Modifying the Bushings for the Capacitive Sender Wire

Modifying the Bushings for the Capacitive Sender Wire

Since I am using the capacitive fuel senders, I had to to modify the bushings that hold the vent line before I could install the line in them. This is because the capacitive plates are wired together and then share the same holes as the vent line to penetrate the ribs. I simply chucked my 1/16th” bit into the drill press and ran it at medium speed and “cut” a notch into each of the 8 bushings (4 per tank) needed. The wire will pass through the notches along side the vent tubing. In no time, I was ready to fabricate the right tank vent line.

Right Tank Outboard Bay, Vent and Return Lines Cut

Right Tank Outboard Bay, Vent and Return Lines Cut

Here you see the right tank vent line, run above the return line, to the last bay in the tank. It was fun to push the line from the inboard side and feel it simply slide into the little clip installed with the filler neck with precision. This is after I finished the inboard end, and then cut the line to length. At some point, once the outboard rib is sealed, riveted, and nice fillets made, I will final install this vent line and bend the end up to get it close to the highest point of the tank, or closer to the skin. It’s good to go for now.

Right Tank Vent and Return Lines Complete

Right Tank Vent and Return Lines Complete

Here you see the inboard side of the lines complete. I pretty much did this by eye and either got lucky, or my skills at eyeballing are improving. I also threaded the capacitive sender wire through the first bushing for a test fit. I determined that I needed just a hair bigger notch in the bushings after this trial fit. I removed them, opened them a little bigger, and then replaced. It took me a hour or so to get the vent line bent, flared, cut to length, and attached as you see it here. At this point, it was late, so I called it a night. I will likely attempt the left vent line and the capacitive sender plates for both tanks in the next session. Then it will be time to seal and rivet the inboard and outboard ribs.

Feels good to be making progress again.

Categories: Tanks

High Time for Interior Tank Ribs

May 24th, 2014 No comments
20140524_200743

Ribs Riveted and Gooped

Man…am I glad that part is over!!!

As you can see from the log, I have not done a good session of work in some time. I actually sealed the ribs to the skins back in September 2013. The ProSeal on those interior ribs was certainly well cured. It was also nice and dusty from sitting in the shop idle. Needless to say, I needed to get out to shop for a good long day of work.

I spoke to a couple of my fellow RV’ers and was basically given the ultimatum. “Build, or I am giving up on you!” was actually spoken by one. I couldn’t have that. Todd has been a good source of encouragement, help, tools, and general motivation. I needed to be able to tell him next time I saw him, that I had made progress. And I need to return his loaned clecos and sealant gun. 😉

It was settled. I would rivet the tanks over Memorial Day weekend.

I got out to the shop around 0900 and pulled out the two oldest of the cartridges of B2 sealant. They technically expired in March of 2014, but I have had them in the refrigerator (yes, in the house, then the drink fridge I got for Christmas) since I bought them. I have heard that you can extend the shelf life considerably by keeping it cool. Since it is only two months out of date, I decided to mix it up and see how it would flow. Turns out, it was good as new.

So, armed with 12 oz of sealant (two 6 oz cartridges), Semco gun, MEK, and lots of gloves and rags, it was time.
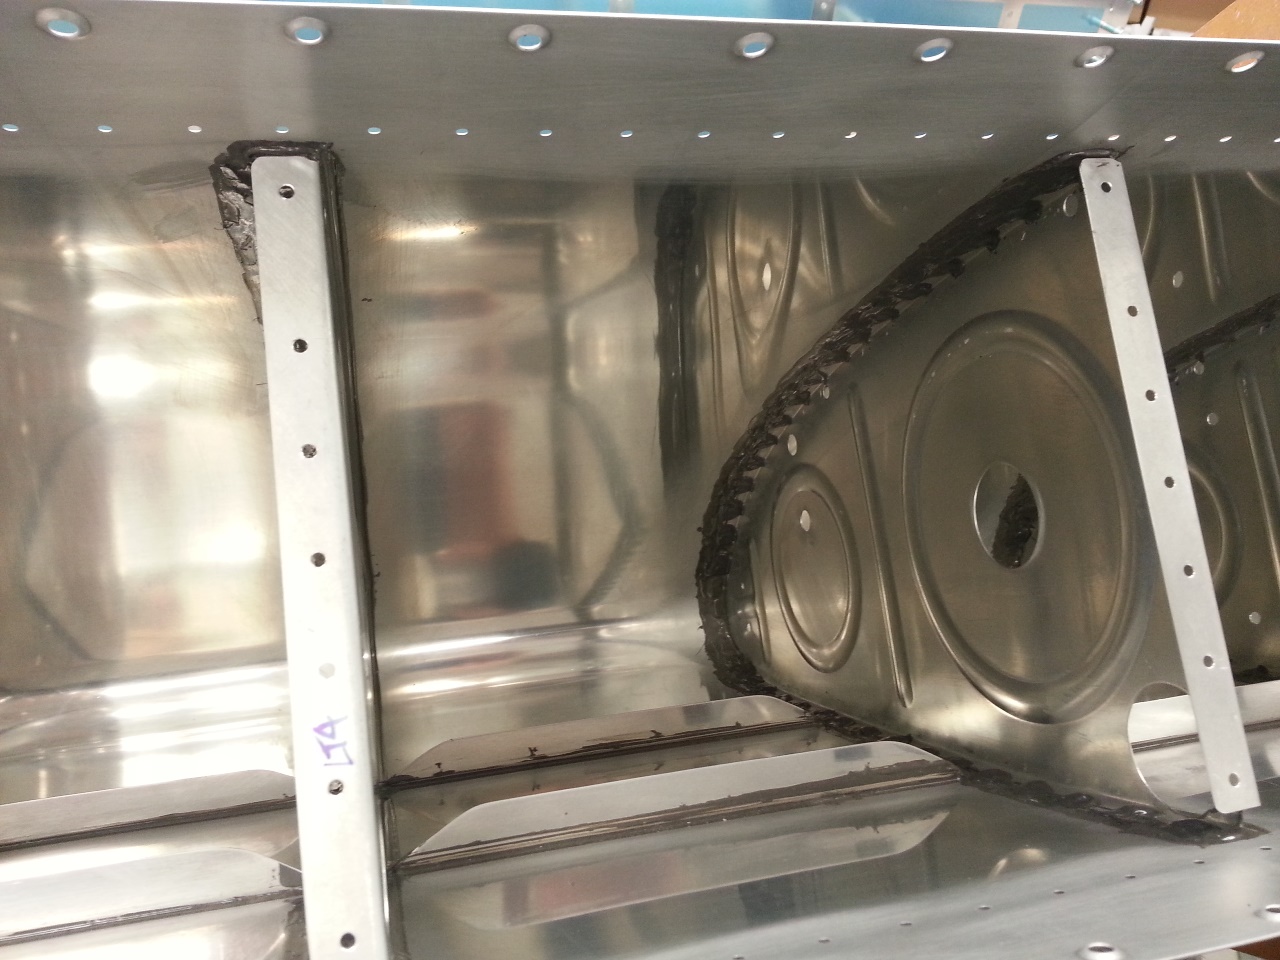
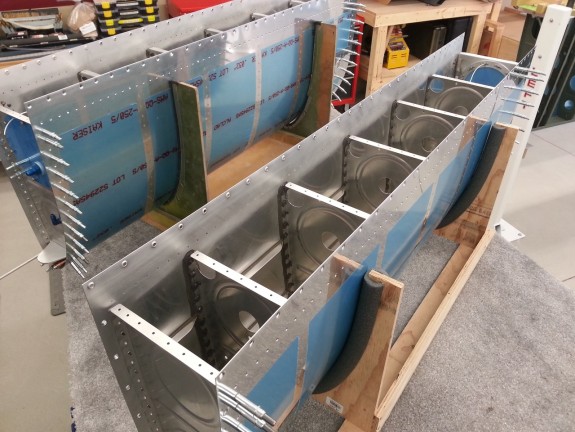
Inside the Tanks

Inside the Tanks

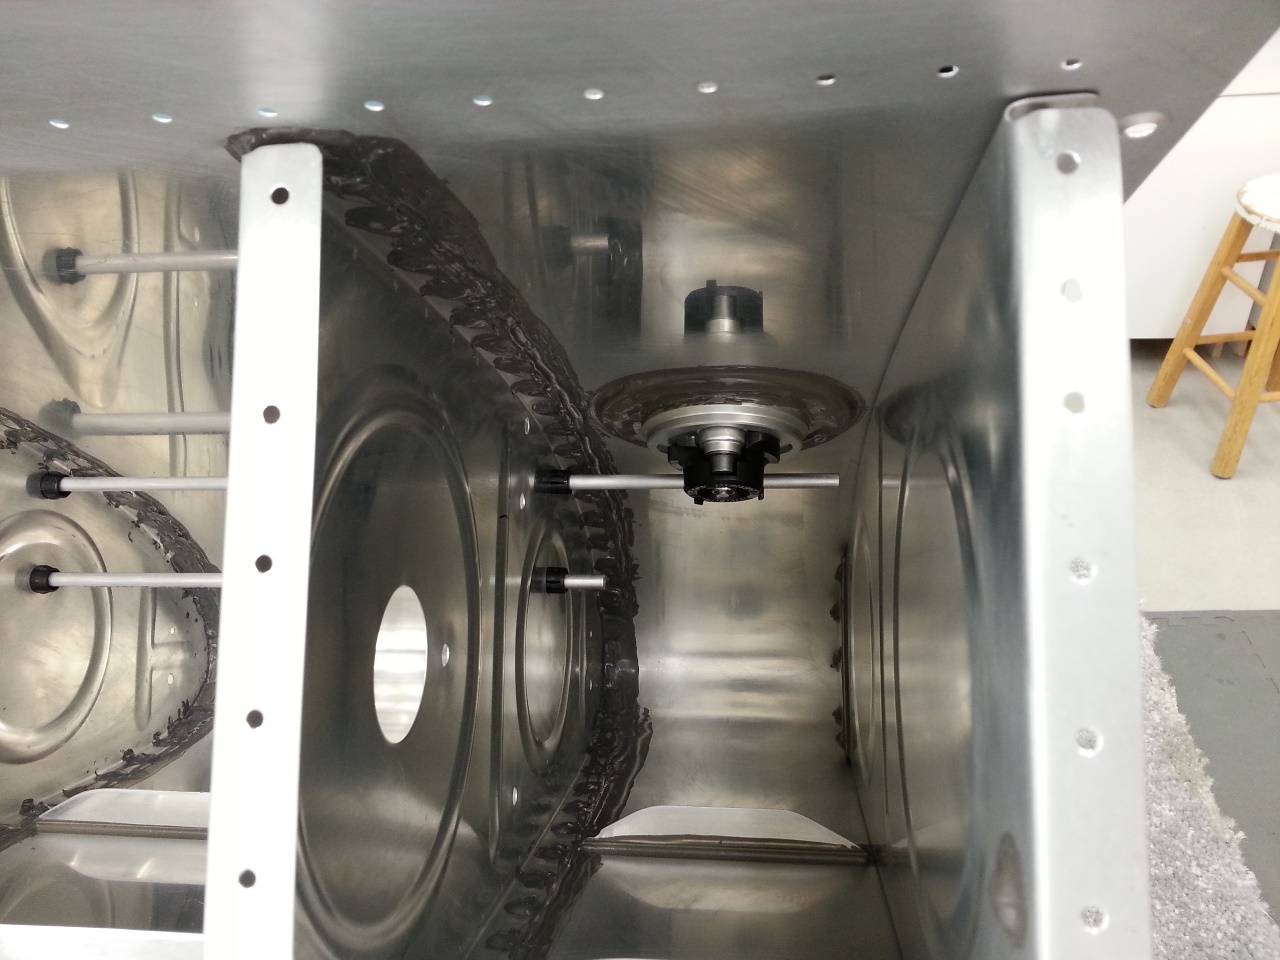
Since the ribs were sealed 8 months ago to the skins, the risk of them pulling apart from the skins was, well, zero. Some airplanes actually seal ribs to skins and call it good, no rivets. I removed all the clecos from the bottom side of the right tank. I figured it has been a long time since I riveted using a gun and bucking bar, so starting on the bottom was a good idea in case I messed some up. Next up, I wiped all the rivet lines inside and out with a rag and MEK to clean any residual cured ProSeal in the dimples and human bi-products. I then mixed up the first cartridge of sealant and got set to rivet. Using the Semco gun, I was able to simply use the nozzle to shoot a small amount of ProSeal into each dimple. I then inserted a MEK soaked and dried rivet into each dimpled hole, and then pushed them with a sucker stick to seat them nicely in the bed of sealant in the dimple. At this point I riveted each rib, nose to end, working from the middle rib out. After each line was set, I cleaned both sides with a light wipe of MEK. This was simply to insure that the shop heads were set correct and not to leave a significant mess.

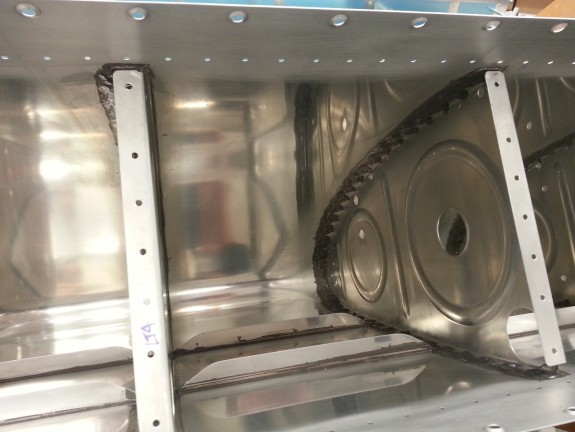
I was able to get one tank per cartridge worth of rivets done AND then hit the shop heads with a little drop of sealant, smeared with a sealant spoon, to create a completely airtight assembly. I only used about 3 oz of sealant on each tank, but did not want to risk the exceeding working time of the ProSeal. Inevitably, I needed to hit a few rivets a bit more, some I had to drill out and replace. For the most part, I did OK. All in all, I kept the ProSeal on the tanks, or on gloves and rags. Pretty clean surprisingly.
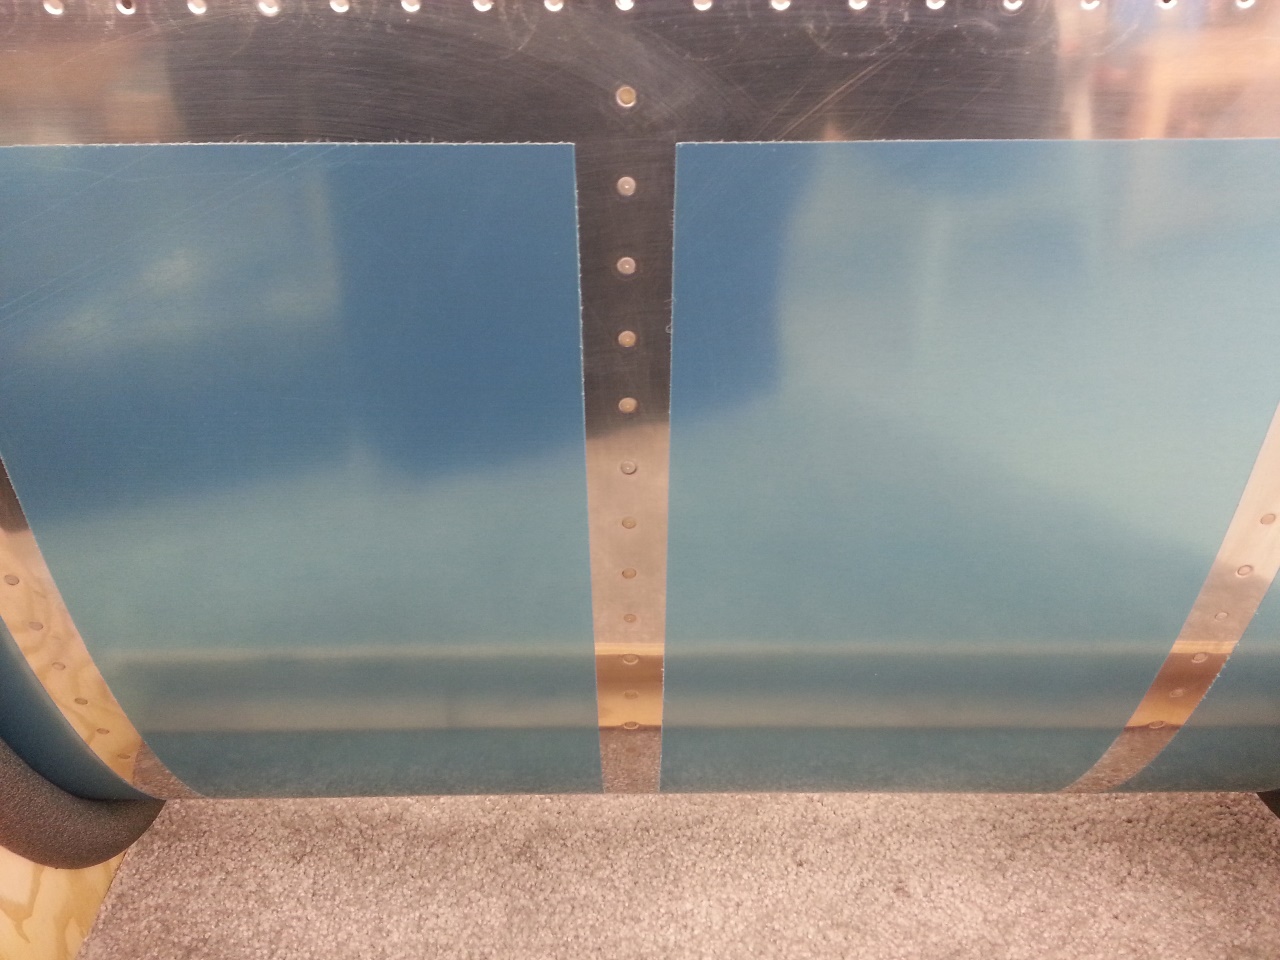
Cleaned and Set

Set and Cleaned Up

I spent nearly until 1600 riveting, cleaning, checking, sealing, etc. Needless to say, I am sore in places I have not been sore in some time…again. Some of my manufactured heads are sitting a little high, but I know a little cheat…rivet shaving, that will clean those up. That will of course happen after all the sealant is cured and likely before paint. For the most part, they turned out pretty good. I think this may have been in part the sealant that ended up on the flush rivet set not permitting a good hit. It could have been technique being a little rusty. It could have been too much sealant under the countersink. When I say high…we’re talking very slight.

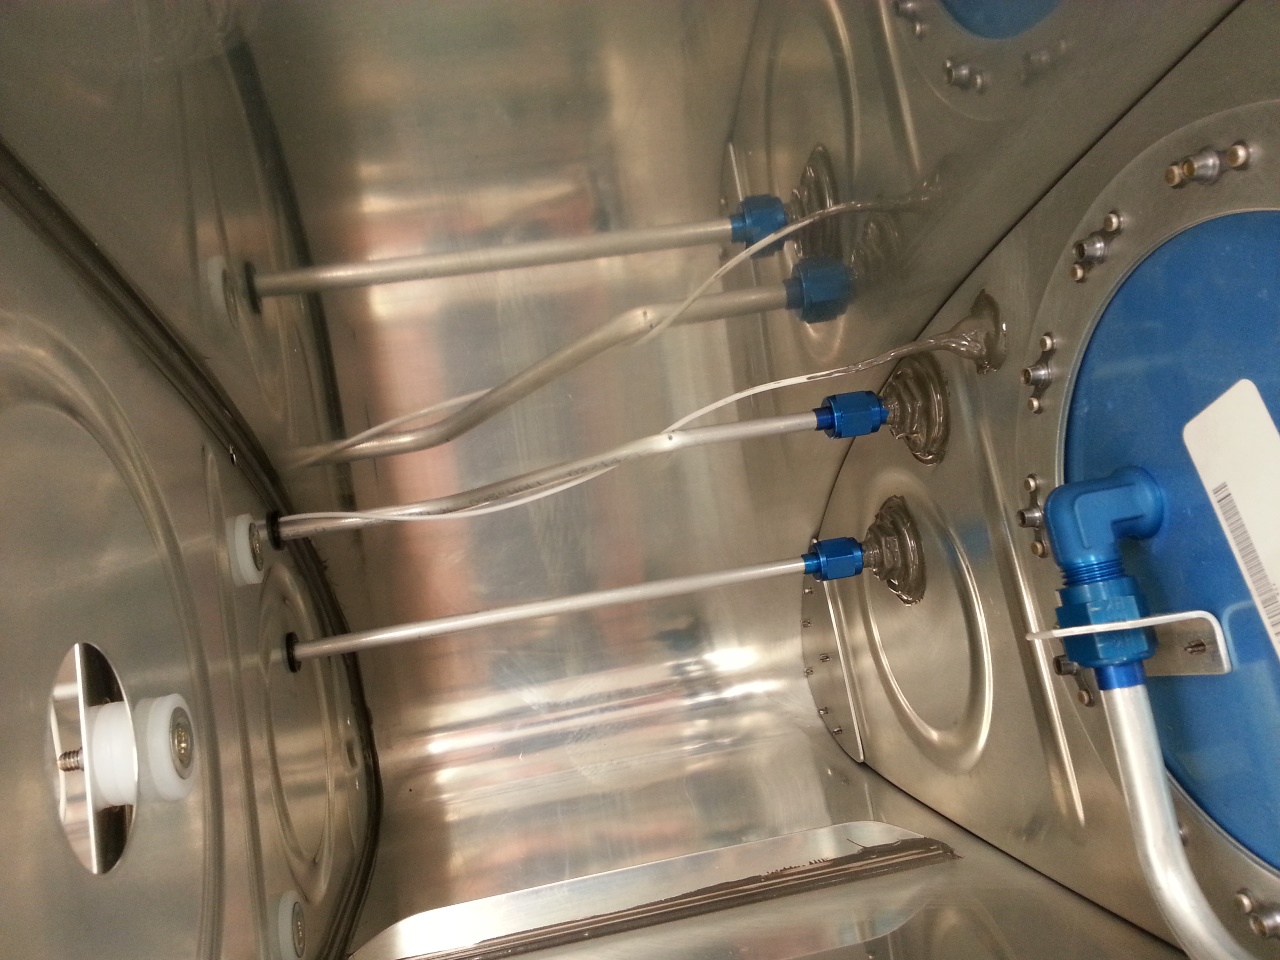
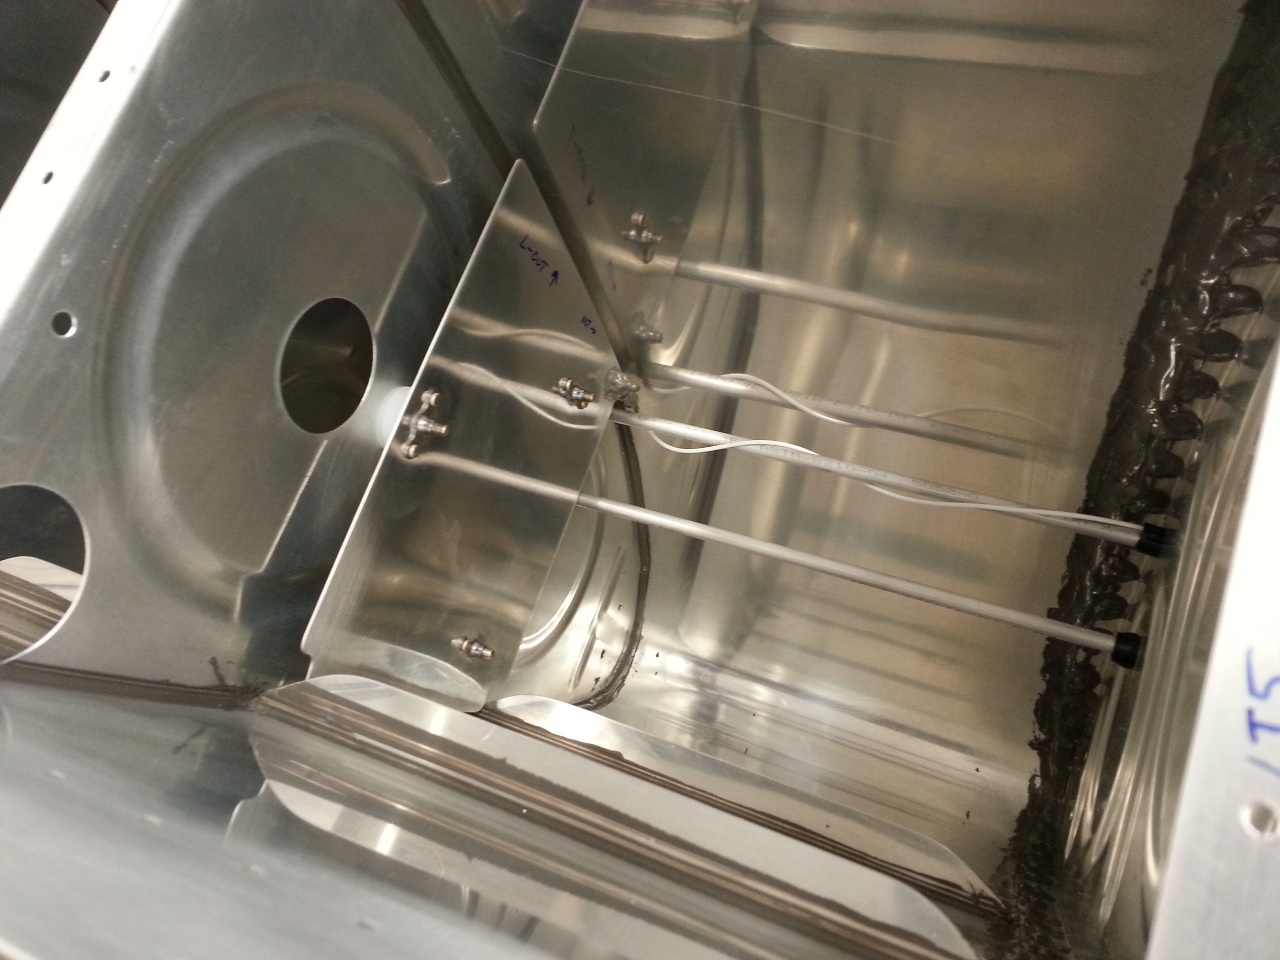
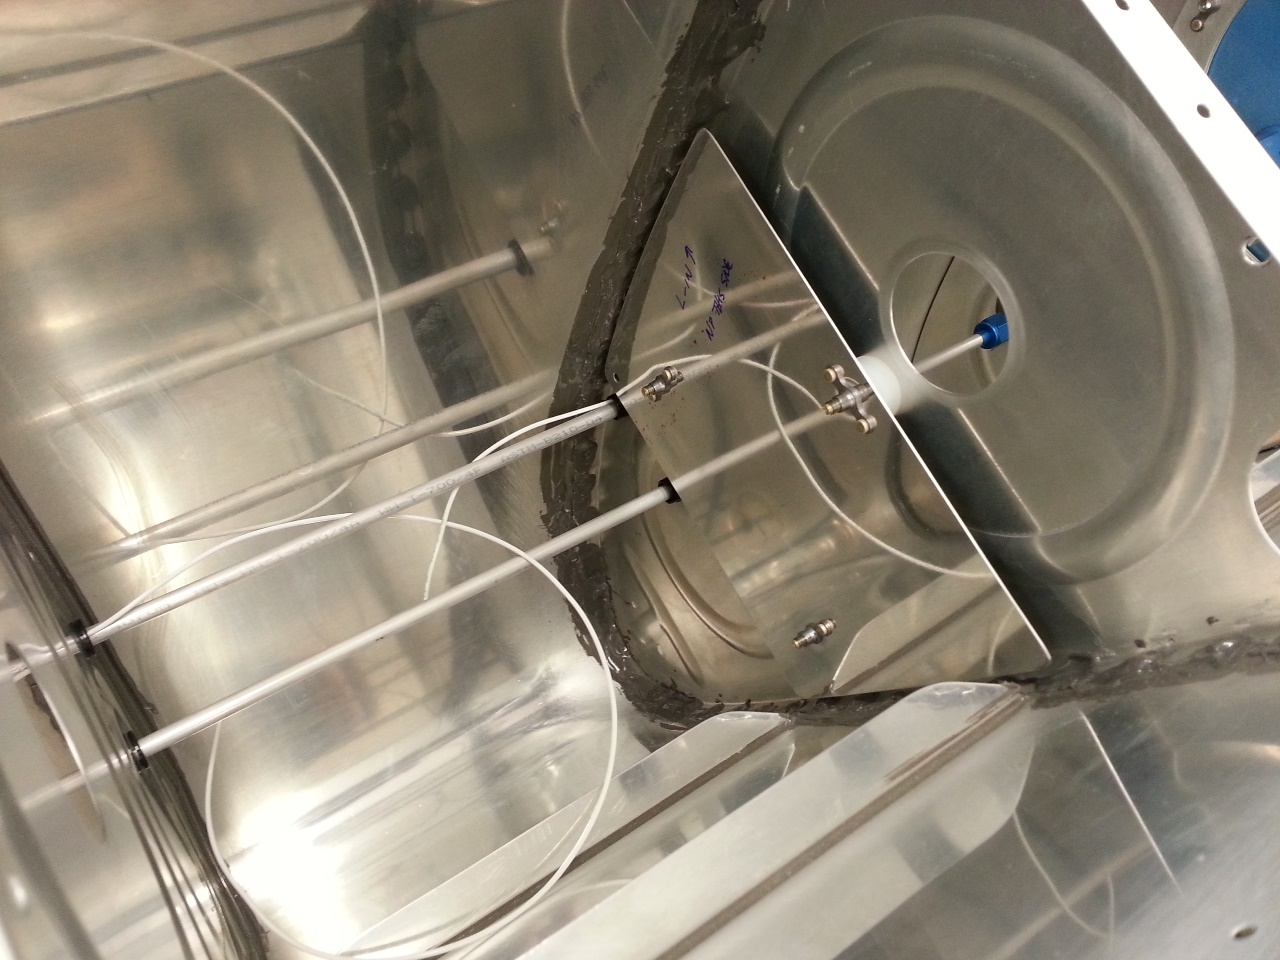
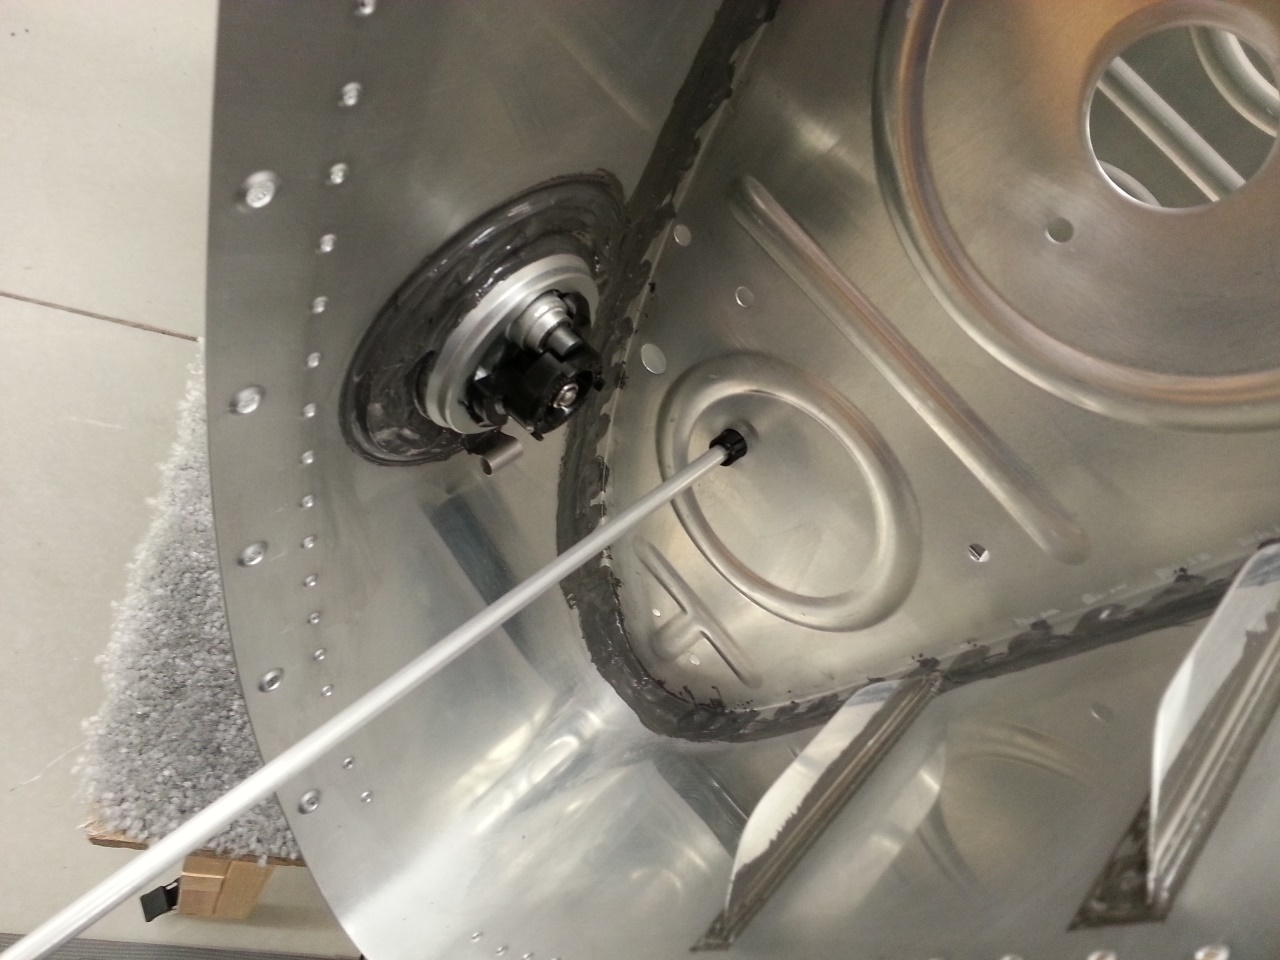
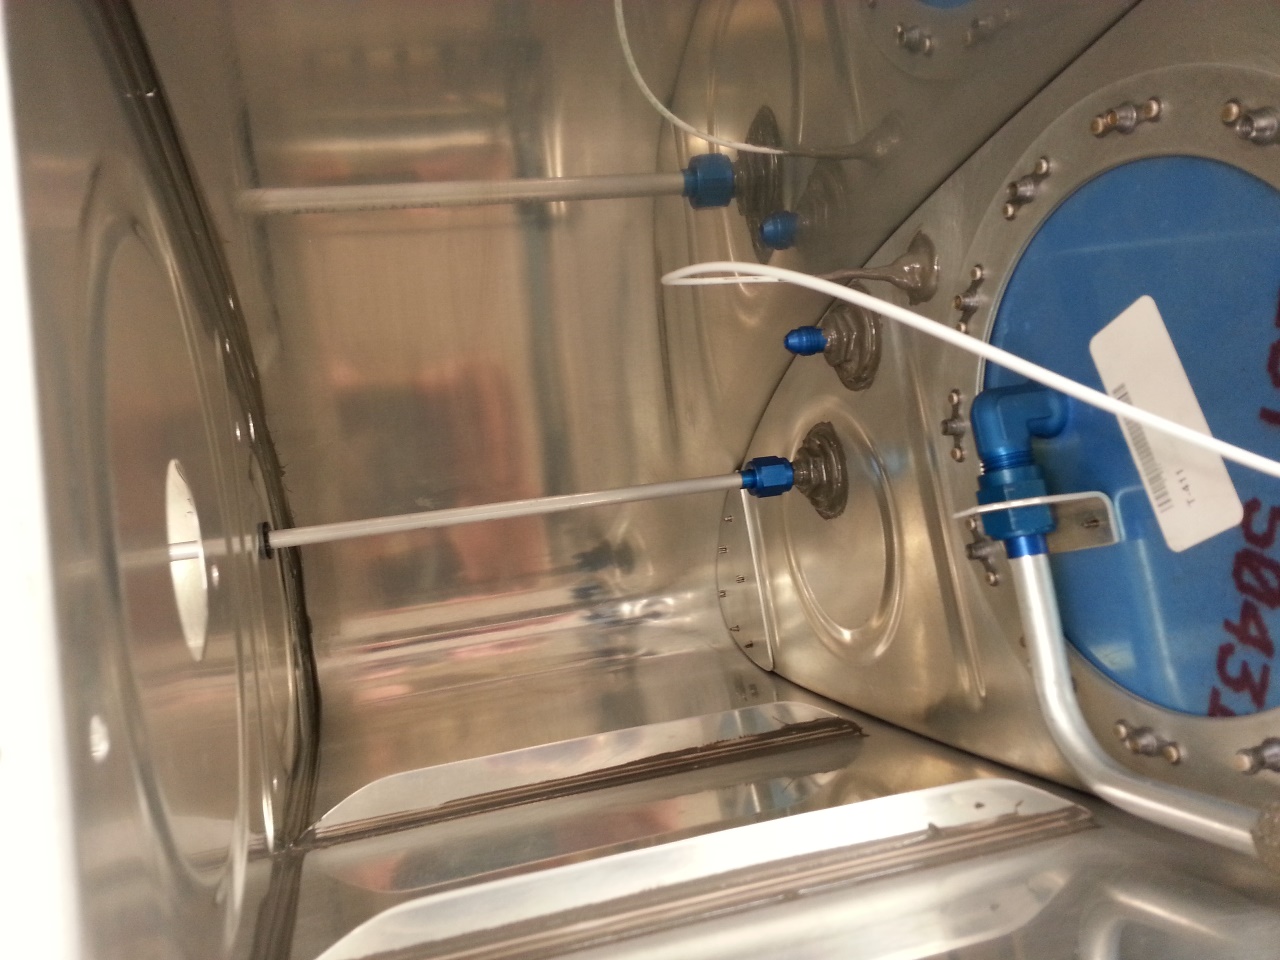
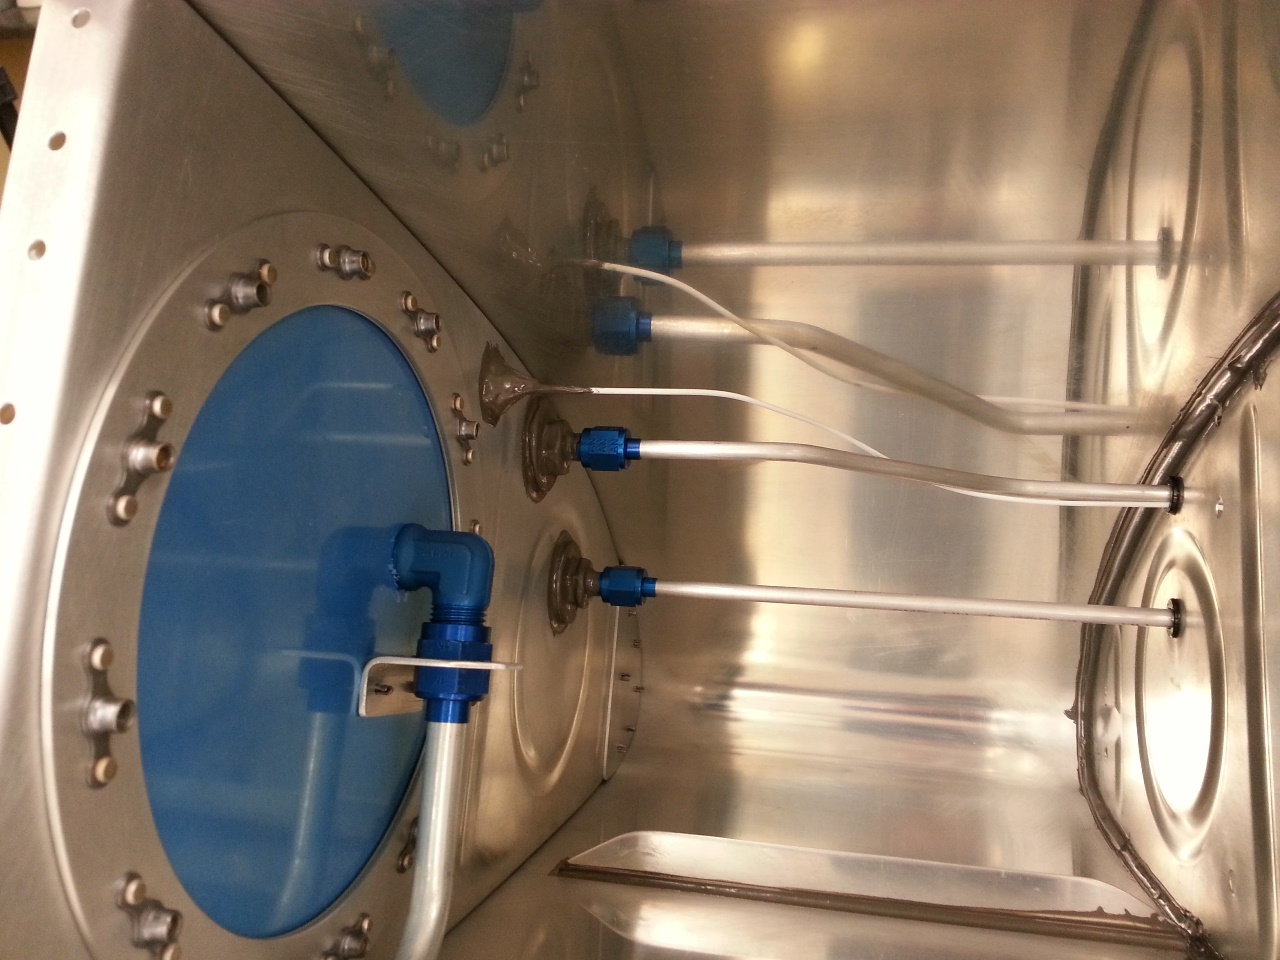
I think I will take Monday off and let this sealant cure for a week in the house before moving on. I will need it to recover from the body soreness anyway. 🙂 Next up will be the plumbing of vent/return lines, capacitive fuel sender wiring/plate install, and then riveting/sealing of the inboard and outboard ribs. Fortunately the rest of the riveting on the tanks is done with a squeezer or rivet puller. As for now, the gun/bucking bar method is done on the tanks. I really cannot wait to be done with ProSeal.


Categories: Tanks

Tanks resume some more…

May 17th, 2014 No comments

Sorry, no pictures again. I did however complete the work I started earlier this week.

Basically, I cleaned all the holes of extra proseal in preparation for wet setting the rivets.

Took a bunch of time, but it was work. Work that needed to be done.

Now I simply need to wipe each rivet line clean with MEK and go to town riveting.

Categories: Tanks

Tanks resume…

May 15th, 2014 No comments

No pictures, but I did make some progress tonight.

I was out in the shop doing other things and just decided to clean out 1/4 of the rivet holes in preparation for riveting.

I basically removed the clecos from every other hole in a line, passed a #40 bit through them by hand, and then chased the dimple with a countersink by hand.

I still need to scrape a little on the inside the tank for each dimple and then hit each with MEK to clean off scraps and human oils.

I need to repeat this on the other 3 remaining sides of the tanks and then I think I will be ready to final rivet them.

Progress is progress, one rivet at a time.

Categories: Tanks

Fuselage Kit Arrives!

May 5th, 2014 No comments
Fuselage Kit Arrives!

Fuselage Kit Arrives!

Today was like a late Christmas for me. I ordered the fuselage kit back in early March to avoid the price increase that Van’s does every year. That and I needed something to be in the way so as to motivate me to work on getting the wings done. I didn’t take any pictures other than the above. I was apparently too excited watching FedEx Freight unloading it from the truck to take any others. Speaking of FedEx Freight, Anne at Van’s does a killer job of negotiating the shipping down. I could not believe the low cost of this shipment. That, and FedEx delivered to my house, with a lift gate, rolled to my shop on a fork lift dolly, to where it sits in the this picture. Quality service.

I chose to modify the kit some. I deleted all the parts related to the brakes (WHAT?) as well as the stock fuel selector and upgraded both to much nicer hardware. Other than that, it was a pretty vanilla order.

Tell us about the upgrades you say? OK.

I chose to go with a nicer option for the brakes/tires/wheels, than Van’s offers. While the stock would work, after owning my own plane, I always look to where I can get the most enjoyment from the least amount of maintenance. My Beech has been a joy in that respect, but has had its share of troubles. The upgrade I chose to take advantage of is an offering from Beringer Aero.

Beringer Aero Art

Beringer Aero Art

Beringer has been around for some time in the Indy and Motorcycle racing world and makes some seriously NICE hardware. They are somewhat new to the Aero side of things, but they entered with a very nice offering. Basically, you get a full pedal to tire kit from them that has everything you need to effectively stop and roll. Incidentally, they recently were picked up by Cirrus Aircraft as OEM for their new Gen 5 aircraft. Others are also coming on-line using Beringer as stock as well. To encourage more RV implementation, they recently offered (January time frame) the full kit at a 30% discount to the kit purchased by an EAA chapter member. I checked to see if any Chapter 23 members here in Salt Lake City had purchased a kit already, and was pleased to find out I would be number 1, and was even more pleased to hear they would still honor the discount in March. Even at 30% off, it was still a sizable upgrade. I hope that the advantages pay dividends. Let me explain a few of those advantages.

  1. The whole kit is lighter than stock (good to save pounds anywhere you can).
  2. Easier maintenance with banjo type fittings.
  3. Nicer brake lines.
  4. The Anti-Skid regulator (provides better ground control, important in a tail dragger).
  5. Tubeless Tires.
  6. Sealed bearings.
  7. Smoother master cylinders.
  8. Most Important-They LOOK AWESOME!! (Too bad the wheels will be under wheel pants).
Beringer - Reservoir to Caliper - Art in Motion!

Beringer – Reservoir to Caliper – Art in Motion!

Small downside to the Beringer stuff is that they are from France. They are just getting a distribution network setup in the US, but stock is limited at the moment. I did have several items missing from my initial shipment, but they are quick and responsive at making it right. The above photo was one I took to show them I was missing some fittings, but it does a good job of showing how you get from the reservoirs to the calipers. I would hit them up soon if you want to get the same deal. They aren’t saying when it expires.

Basically, I had to delete all master cylinders/lines/reservoir included in the kit and add the parts for the co-pilot pedals. The rest (wheels/tires/brake calipers) I will need to delete from the Finish Kit when I go to order it.

The next upgrade I made was to the fuel selector valve. The stock one is actually a brass valve you can find in your local hardware department…really. It works, but…

20140506_151359

More Art with Metal

This one is made by Andair Ltd. This valve is also a duplex valve. I am not sure at this point what engine/injection system I am going to use. Some use a return line, and some don’t. The other consideration is, that who knows what is coming down the line by the time I do have a need for an engine. Rather than guess…I decided when starting my fuel tanks, that I would put in provisions for a return line…just in case. To continue this into the cockpit, I chose to swap the fuel valve for one that could continue the return line provisions all the way to the firewall. if I end up using it, it will be there. If I don’t, I can simply cap the lines off.

The form and function of this valve is very nice and very smooth.  I really like the safety enhancement as well as you cannot accidentally switch this valve to off. You will pay a little premium for it.

Each crate I open from Van’s, I am amazed at how they get it all in such a small space. This one was no exception. It must take a spacial awareness unlike any other to figure it out. There was even space left after it was all said and done. Trouble is, once you take it all out to inventory, there is no way you are able to get it back in. The crate now is holding the large skins. The rest is now all over the shop.

Where does that leave the project? Well…it’s definitely time to get the tanks and the wings done. However, I won’t be waiting for parts for some time. I hope before too long to be sitting in a canoe, next to my lovely wife, making airplane noises and imagining we are that much closer to flying off together to exotic locations.

Categories: Fuselage